How to Assemble the Economically Efficient
Toad Hollow Bird Feeder
and Have More Money Left to Buy Food for the Birds
Phil Cheeseman
aai@purdue.edu
pachsmn@frontier.com
A pet peeve of mine has always been that bird seed is reasonably cheap
to buy but the feeders you put it in tend to be designer creations that
often cost more than a year's supply of bird seed. You can understand why
they're expensive, however, if you've ever built one of the cutesy ones
yourself (in a few days time).
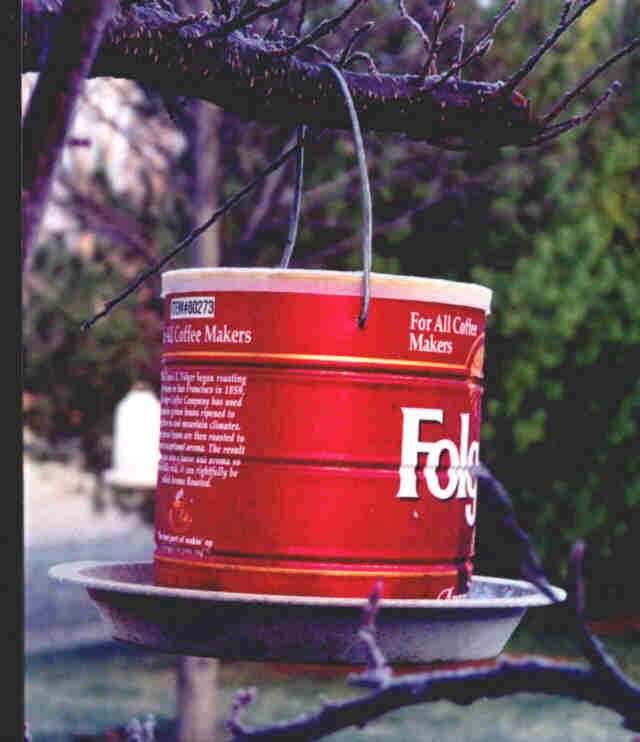
The feeder pictured below can be made quickly for less than $2 so long
as you have a few hand tools and enough shop skill to avoid hurting yourself
while putting the unit together. I've shown the unit as it was originally
painted, probably by Mrs. Olsen, a long time spokesperson for the company
which graciously provided the main part of the assembly.
A Materials List and Assembly Instructions follow the illustration.
Materials List
Tools
-
Phillips head screwdriver.
-
Ice pick or 6 penney nail (you'll need a hammer if you use a nail).
Optionally, a drill and small (1/16 or 5/32) bit.
-
Old style can opener -- the kind that punches a triangular hole in the
can.
-
A stack of newspaper or cardboard thick enough to protect your work platform
from ice pick gouges when you're punching holes through the can and pie
pan.
Materials
-
Coffee can, shortening can, any other type of can that's an inch or two
smaller than the bottom of the pie pan. You need to have the plastic
lid that usually comes with these things.
-
Pie pan (Cost less than a dollar at a well known discount store I frequent
too often).
-
At least four #6 Phillips/pan head sheet metal screws. These tend
to be excess hardware supplied with all sorts of household items, blinds
in particular. Otherwise, you can purchase some at the same place
you'll probably find the pie pan.
-
Wire, line, a coat hanger, or something else for a bail.
-
Duct tape -- not really necessary, I just like to keep some nearby.
Assembly Instructions
-
Empty the can. This can take as long as you'd like but remember the
birds appreciate prompt service. If the can initially contained an
adult
beverage, be sure its effects have worn off before proceeding to the
next step.
-
Use the can opener to make 6-8 equally spaced holes around the bottom of
the empty can. Make the holes in the side of the can, not
the bottom.
-
Use the ice pick or hammer and nail to make several drainage holes around
the edge of the bottom of the pie pan. The holes should be made from
the inside of the pan so the sharp edge of the hole won't cut Tweedy's
iddy feet. The holes should be small enough that Tweedy's toes or
bird seed won't go through but large enough that rainwater will.
-
Mark the center of the bottom of the can and the center of the pie pan
and punch a hole in each center.
-
Place the pie pan over the can bottom with the holes aligned and fasten
the plate to the can with a sheet metal screw.
-
Punch three more holes in a triangular arrangement around the center hole
(through both the pie pan and can bottom) and fasten the pie pan and can
more securely together with the three remaining sheet metal screws.
-
Punch a batch of drainage holes through the bottom of the pie pan and can.
Do so from the inside of the can if possible. You're doing this to,
hopefully, slow the accumulation of moisture inside the feeder.
-
If you're going to suspend the feeder from a branch or hanger, you'll probably
need to make holes near the top of the can as shown above. I held
the can edge over a sawhorse end to punch the hole with an ice pick.
However you make bail holes, be careful. This is where you're most
likely to slip and skewer yourself somewhere because the metal at the top
of the can bends easily and can run away from the ice pick.
-
To rationalize the duct tape, tape the edge of the pie pan so Tweedy can
get a grip. The tape will also take the edge off the cold
metal in the winter when Tweedy's iddy feet are cold enough already.
There, now put some food in it and park it where the birds can find it.
The feeder will not last long, a month or so, without rusting unless you
take the additional step of painting it. My observation w.r.t. painting
is that the birds care very little about the appearance of the container.
I suppose a grant application is in order to determine the reaction the
birds might have to, for instance, a cubist mural on their lunch table
rather than plain 'ol red iron oxide.
Another step in assembly that's not absolutely necessary is to make
a cardboard or sheet metal cone to place pointing upwards inside
of the can. That way seed doesn't cake together in the center of
the feeder. The sheet metal cone can be made using the top of the
coffee can, but youngsters run a real chance of slicing themselves while
trying to make the cone from sheet metal. Wear gloves to handle the
can top, in any case, if you use it for a cone.
Because I have the tools, I've also put these things together using
pop rivets, a drill, etc. It takes longer than the ice pick and screwdriver
method but you get to play with the power tools and can claim the job looks
better after you're through. The birds, again, don't seem to care.
I hope this page is useful to some of you. Happy tinkering.
Phil Cheeseman
aai@purdue.edu
pachsmn@frontier.com