
Warning: Your project must compile in order to get a grade. You will get a zero if your program does not compile.
For this project, you now have two options for submission:
Warning: If you take the second option, be wary of a few things. First, if you opt to skip the milestone, you must turn in the project by the milestone due date. If you turn in the complete project after the milestone due date without completing the milestone, you will lose points. Second, if your final project does not demonstrate that the material from the milestone is completed properly, you may lose points as well.
Knowledge from chapters 8 and 9 is necessary for this project.
Knowledge of complex numbers is also assumed for this project. If you are not familiar with complex numbers, read this primer. Wikipedia is also a good resource.
The Mandelbrot set is a set of complex points that is derived from a fairly simple formula. The boundary of the Mandelbrot set is a fractal, which makes it an attractive visualization (see examples here). The Mandelbrot set has many interesting mathematical properties, but they are beyond the scope of this discussion. The goal of this project is to compute which points in a region are part of the Mandelbrot set, and use the given visualizers to show correctness.
Although you will not write the actual computation to determine whether or not a point is in the Mandelbrot set or not, you should be familiar with how it's computed to aid in understanding the project.
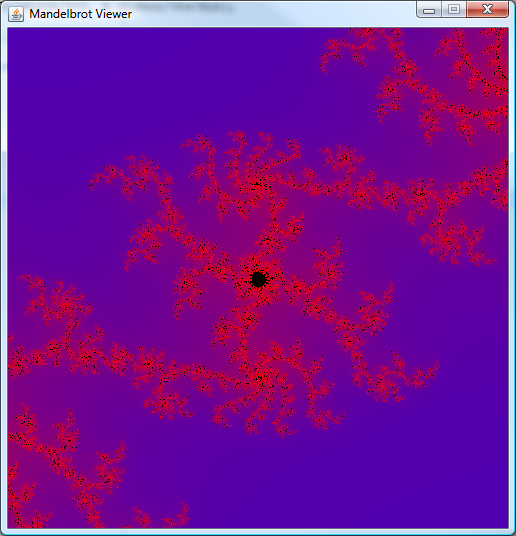
In the above image, you can see many distinct colors. Determining the color of a point depends on the level of the point. The level is computed as follows:
We define z_n=(z_{n-1})^2 + c, with c being the complex point for which we are trying to find the level and z_0=0. Therefore, we have:
z_0=0z_1=cz_2=(z_1)^2+cz_3=(z_2)^2+cz_4=(z_3)^2+cWe calculate up to z_{128} (but this can vary, depending on the desired precision). By definition, a complex point c is in the Mandelbrot set if when calculating these successive z values, the sequence remains bounded. That is, the values do not increase towards infinity. It has also been shown that the Mandelbrot set is contained in a circle of radius 2 on the complex plane. This means that the magnitude of c must be smaller than 2 to be in the Mandelbrot set. In addition, if any of the z values calculated for a complex point c exceeds 2, then the rest of the values will increase towards infinity (meaning c is not in the Mandelbrot set).
If one of these z calculations results in a complex point with a magnitude greater than 2, then its level is the subscript of the smallest z where this is true. Otherwise, the level is zero. In the picture above, black represents a level of zero (which means it's in the Mandelbrot set), whereas the other colors correspond to other levels.
For example, if we want to determine the level of 0+0i (or just 0), we can start calculating all of the z's:
z_0=0z_1=c=0z_2=(z_1)^2+c=0+0=0z_3=(z_2)^2+c=0+0=0z_4=(z_3)^2+c=0+0=0We can quickly see that all of the z's will be zero, so none of their magnitudes will exceed 2. Thus, the level of 0 is 0.
On the other hand, if we want to determine the level of 3+4i, we can start calculating all of the z's again:
z_0=0z_1=c=3+4iAlready, we can see that z_1 has a magnitude greater than 2 (specifically, 5). Therefore it has a level of 1.
Note: As a general assumption for this project, assume that values will always be correct. That is, you shouldn't need to worry about error checking very much, if at all. The focus of this project is on concurrency, not error handling and exceptions.
Your objective for the milestone is to create a subclass of Thread to compute the Mandelbrot set for a given coordinate region and use your results to render it in a provided GUI.
Complex classThe first step is to complete the given code for Complex, which represents complex numbers. As an example, addition is implemented for you. You must correct the subtraction and multiplication methods, which currently return incorrect answers in most cases. In addition, a method to compute the magnitude is left empty. You should also implement this method.
Note: Before implementing these methods, make sure you understand how complex numbers are represented in this class. In particular, the instance variable a represents the real component, and the instance variable b represents the imaginary component. Also, arithmetic operations always create a new Complex object, which makes them easier to reason about, since they behave similarly to Java's primitive types. Again, a review of complex numbers is provided, in case you are not familiar with them.
It is suggested that you use JUnit to make sure your class is working correctly. A starting point is given in ComplexTest.java; it is up to you to make the tests more complete.
MandelbrotImageA complete class MandelbrotImage is provided for you. You should not modify this class, as the original version will be used in grading, but it is important to understand what it is used for. This class represents a region of the complex plane that will be rendered by the provided GUI. An image is defined by its top left and bottom right complex points. The size parameters in the constructor, width and height, determine the number of points between and including the end points. When you create your thread class, all of the computed data will be stored in a MandelbrotImage object.
There are three interesting methods in this class:
setLevel() sets the Mandelbrot level for the point on the provided row and column. This can later be retrieved by getLevel()getLevel() retrieves the Mandelbrot level for the point on the provided row and column.getPoint() retrieves the complex point at a certain row and column.Note: It is important to distinguish between the complex points and rows and columns. For example, if the top left point is 1+0.5i, then its corresponding row and column is 0 and 0, because it is the first point in the region. That is to say, as a increases, the column increases, but as b decreases, the row increases. The row and column are the indexes of the point, not the actual coordinates/coefficients.
As an example, if we create a new MandelbrotImage object with new MandelbrotImage(new Complex(0, 0), new Complex(2, -3), 3, 4), then the following points will be in the image at the row and column:
| Row | Column | Complex Point |
|---|---|---|
| 0 | 0 | 0+0i |
| 0 | 1 | (2/3)+0i |
| 0 | 2 | (4/3)+0i |
| 1 | 0 | 0-0.75i |
| 1 | 1 | (2/3)-0.75i |
| 1 | 2 | (4/3)-0.75i |
| 2 | 0 | 0-1.5i |
| 2 | 1 | (2/3)-1.5i |
| 2 | 2 | (4/3)-1.5i |
| 3 | 0 | 0-2.25i |
| 3 | 1 | (2/3)-2.25i |
| 3 | 2 | (4/3)-2.25i |
Note: Due to an error in the provided code, the bottom right point is actually excluded from the calculation. That's why 2-3i doesn't actually appear in the above table.
MandelbrotThread classA starting point for creating a thread that computes the Mandelbrot set is given to you. The constructor takes a lower and upper bound on the row, as well as an image, where the computation is to be stored. You should create a run() method that computes the level for every column in the given rows. That is, for each row and column:
MandelbrotImage method)calculateMandelbrot() method.MandelbrotImage object, using setLevel()A partially complete example testing program is provided for you here, which requires this complete GUI to run. You should complete the class by starting all of the threads and waiting for them to finish running. That is, when the last line is called, all of the threads must be done running (if they aren't, you'll see black stripes on the GUI). You should test different scenarios (for example, different region boundaries and number of threads). The default parameters should generate a picture like this:
Note: You must run the threads in parallel. If you call run() then you will lose points.
The image below results from the set of coordinates that have been commented out, which renders an image with the top left point as -1+i and the bottom right point as 1-i.
To run the class after you've completed it, simply run MilestoneMain as you normally would run a main class. You should make the height of the image divisible by the number of threads you have, or account for a possible rowMax that is larger than the actual image size.
Your milestone must be turned in electronically by Wednesday, October 7th at 9:00 pm. You should turn in all of your Java source files. Project turnin is similar to lab turnin. Late submissions and fixing incorrect submissions (e.g. submitting the wrong file) will not be accepted. Remember that each submission overwrites all previous submissions. Prior submissions cannot be retrieved.
Use the following command from the directory of your project to turn in your project 3 milestone:
turnin -v -c cs180secXXXX -p project3m *.java
where XXXX is the division and section number for your lab such as 0101, 0201, 0301, etc. Note that these numbers correspond to the bold numbers associated with your lab on the Lab Divisions page.
Note: Please remember to submit only the files for turnin, rather than the directory containing the files. That is, use *.java as in the previous instruction, rather than turning in a project3 directory.
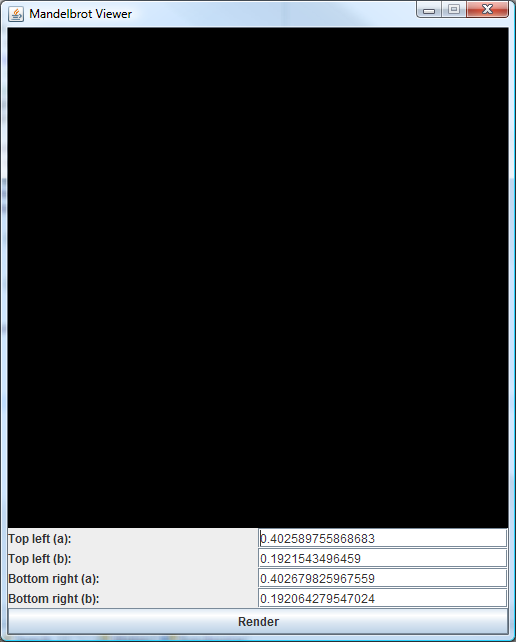
Your next task is to add synchronization to allow the computation threads from the milestone to run continuously, in order to handle multiple image computations. When a MandelbrotThread starts running, it should wait for notification from the new GUI (pictured below). Once it receives notification, it should perform the necessary computations, given its parameters, which are set by the GUI before the notification. As the computation happens, the GUI waits for notification for when all of the threads finish their computation. The last thread should notify the GUI so that it can render the result. After a thread finishes its computation, it waits for the next render command from the GUI.
MandelbrotHandler classThis new class being introduced will be used to manage communication between the new GUI and the MandelbrotThread objects that you implemented for the milestone. It has four methods you need to implement:
waitForRenderCommand() will be used by the computation threads that you made. It should wait() for notification from the GUI thread before starting a render.sendRenderCommand() is called from the GUI thread only, whenever the user presses the render button. When this method is called, the MandelbrotThread objects should stop waiting (from waitForRenderCommand()) and perform the computation before waiting again.waitForRenderToFinish() is used from the GUI to wait until all threads have finished computationsendRenderFinished() should be called by the last thread to finish computing its part of the image.The setImage() method is used by the GUI to change the image before starting a render. You shouldn't need to modify it.
MandelbrotThread classAs mentioned, instead of having a thread compute its portion of an image and exit, we now want the threads to run forever. Thus, the thread should now loop infinitely and do the following inside the loop:
MandelbrotHandler methods)MandelbrotHandler methods). You should determine whether or not the thread is the last one running by accurately maintaining the renderingThreads variable in the handler class. Notice that setImage() sets renderingThreads to the number of threads, so it's only necessary for each thread to decrease the count by one when it finishes its computation.In addition, the constructor must take an additional parameter at the end, which is the MandelbrotHandler object. It is necessary to wait for signals and send them. For an example of how the new constructor is called, see the MandelbrotHandler code.
Note: You must make sure that possible concurrent writes are properly protected. Even though it's unlikely that 2 threads will try to modify renderingThreads at the same time, it's much more likely that concurrent modification will happen if there are 500 computation threads.
A new main class and the new GUI class should be used for testing. These classes are both complete, so you shouldn't modify them. The GUI will start with a black picture, as shown above, and show a render when you press the render button. You can change the parameters in the GUI, but you cannot press the render button while a render is in process. If you do, an error will appear. This relies on correct maintenance of renderingThreads in the MandelbrotHandler object, so if an error does not appear in the middle of a render, then your synchronization is not working.
Your project must be turned in electronically by Wednesday, October 21st at 9:00 pm. You should turn in all of your Java source files. Project turnin is similar to lab turnin. Late submissions and fixing incorrect submissions (e.g. submitting the wrong file) will not be accepted. Remember that each submission overwrites all previous submissions. Prior submissions cannot be retrieved.
Use the following command from the directory of your project to turn in your project 3:
turnin -v -c cs180secXXXX -p project3 *.java
where XXXX is the division and section number for your lab such as 0101, 0201, 0301, etc. Note that these numbers correspond to the bold numbers associated with your lab on the Lab Divisions page.
Note: Please remember to submit only the files for turnin, rather than the directory containing the files. That is, use *.java as in the previous instruction, rather than turning in a project3 directory.
If you are having trouble submitting your files, talk to your TA for help.